
My first blog post laid out a platform introducing you to the Git/Github, and urged the need for version control while managing technical projects. Now, I am going to take you a step further and present you with some of the popular Git commands to make your workflow easier. While it might be a bit intimidating to start using Git/Github at first for those with a limited programming background, I have made every attempt to make this tutorial easier to follow, ably complemented with visuals.
As a part of this tutorial, let’s assume that we are trying to come up with an outline of a technical report after successfully finishing a project. For simplicity, I have demonstrated the version control in a text file using Git. However, this could be easily extended to any file type/script that you are working on. This tutorial also assumes you have some experience working with the Command Line Interface (CLI).
Okay, let’s jump right into the tutorial now!!
1. Install Git

First, we will start by installing Git on our computer. Please refer to the Git documentation for detailed instructions based on Linux, macOS and Windows users. For windows users, I recommend using Git Bash which provides a terminal Git command experience. To check if we have installed Git correctly in our computer, let’s open up a new terminal and type the following command to check the version of the Git installed.
git --version
This should return a valid version type of Git. I have the following version in my laptop:
git version 2.27.0
Let’s now go ahead and set the username and email address that you would like to associate with your Git account.
git config --global user.email 'your valid email'
git config --global user.name 'your name'
2. Create a folder and initialize an empty repository
We will now create an empty folder called project where we will be working on developing the outline of the manuscript. Go to the desktop and create a new folder called project and change the current directory to point the project folder. You could either do this manually or using the terminal as follows.
cd ~/desktop
mkdir project
cd project
“But wait..how do I let Git know to track my project folder??”
- Great question, we do it by the following command…
git init
This would initialize an empty Git repository at the project folder. Note this command creates an additional .git subdirectory in our existing project directory.
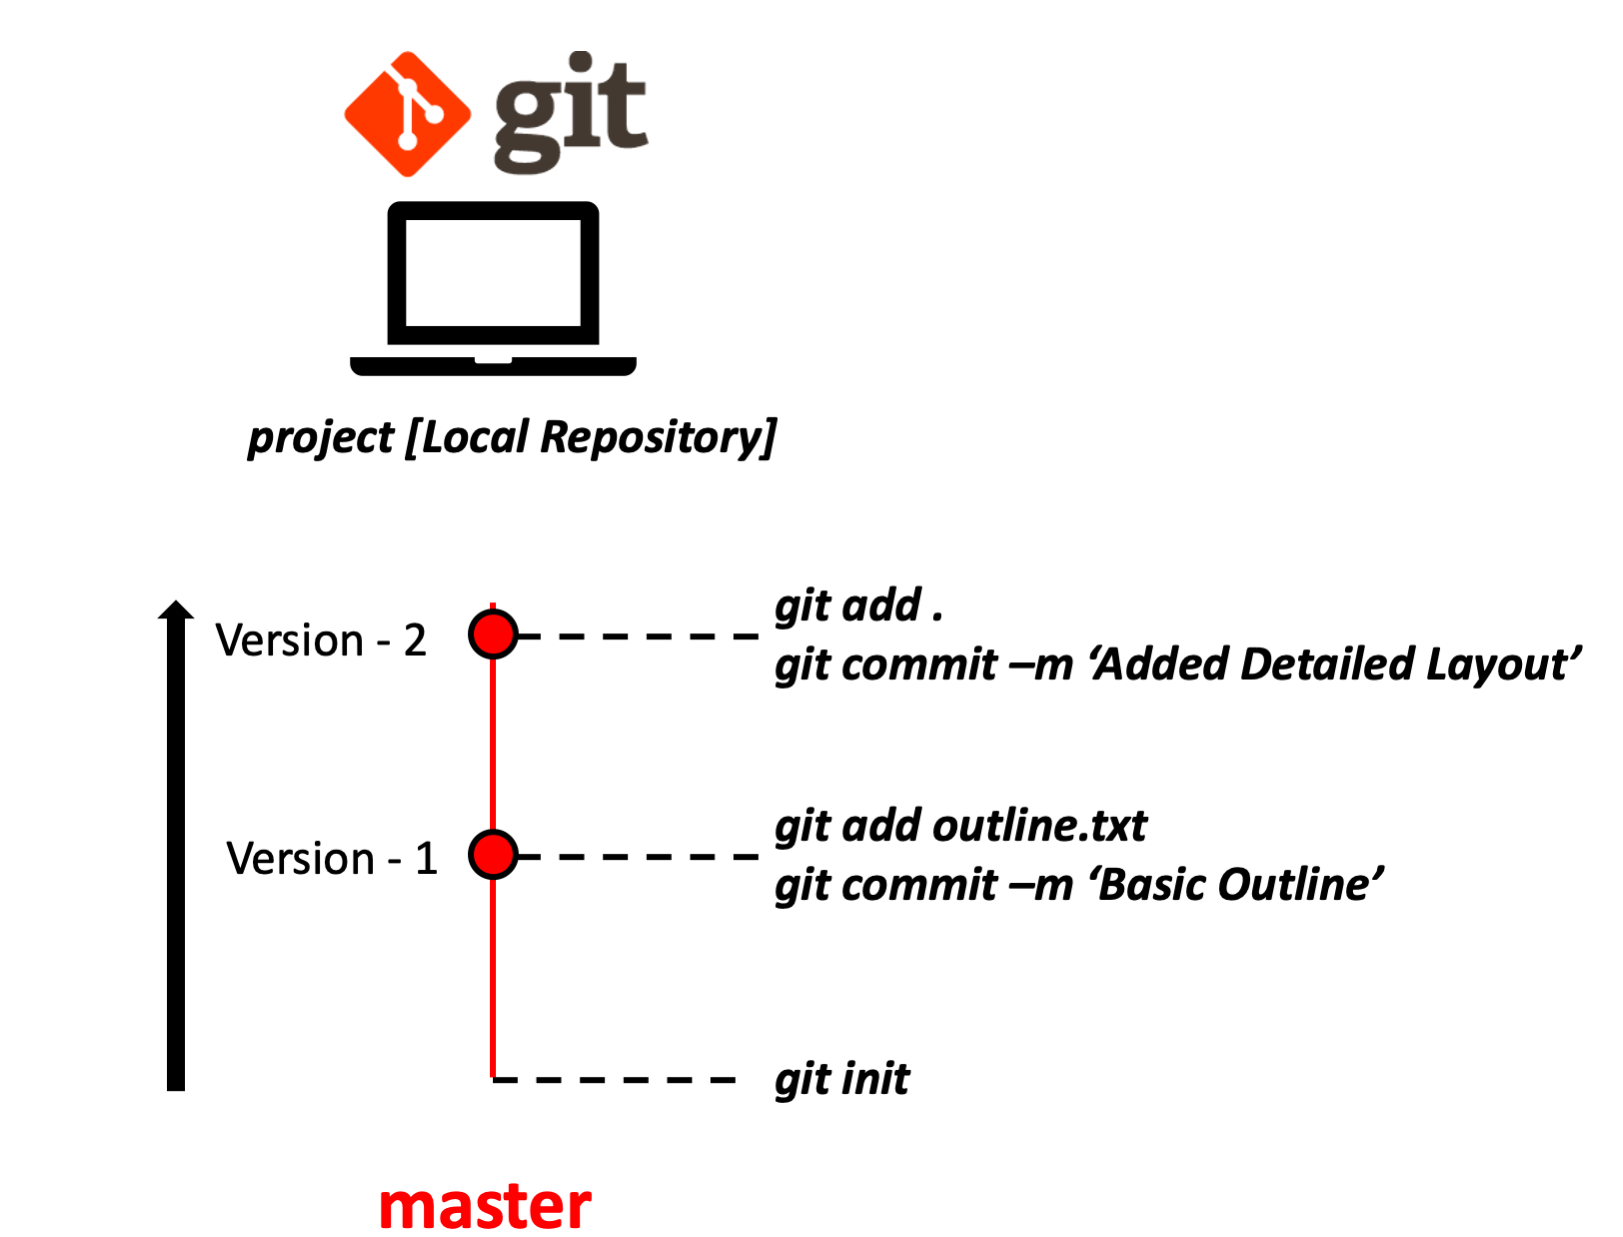
3. Add and commit a file to our repository
Let’s now create the report outline in a .txt file inside the project repository. Go back to the terminal that we were working on, and create a new file called outline.txt.
nano outline.txt
This will open up the GNU nano and add the basic layout as follows, and save it and exit out of the text editor.
Title

Abstract
1. Introduction
2. Experiments
3. Results and Discussion
4. References
Note: I have used nano as the text editor in my demonstration. Feel free to use the editor of your choice. Most of the text editors come pre-installed in Linux systems.
Before we ask Git to start tracking the file that we just created, we will first try to understand the concept of staging area. It’s important to add each file that you would like to track onto the staging area from your current working directory. And, all those files which are outside of the staging area are not tracked and the version control is not maintained. So, let’s add the outline.txt file to the staging area by the following command:
git add outline.txt
Now, let’s record the changes that we did on outline.txt. Git has a magic command called commit which takes the snapshot of the repository at any point in time. It is achieved by the following command.
git commit -m 'Basic Outline'
-m here refers to the commit message. This helps you to summarize the changes that you did by a message.
1 file changed, 7 insertions(+)
 create mode 100644 outline.txt
4. Let’s do one more commit
We will now make some more changes to the file outline.txt and add a little detailed version of the outline as follows. Let’s open the outline.txt again from the terminal,
nano outline.txt
And make the following changes or any modifications that you would like to do and save and close the editor.
Title

Abstract
1. Introduction
2. Experiments
3. Modeling
4. Results and Discussion
5. Conclusions
6. Acknowledgements
7. References
8. Appendix
Before adding the file to the staging area and subsequently commiting it, let’s now try running a new command:
git status
This shows a message that the file outline.txt was modified.
Changes not staged for commit:
  (use "git add <file>..." to update what will be committed)
  (use "git restore <file>..." to discard changes in working directory)
    modified:   outline.txt
As before, let’s first add the file to the staging area and then commit it.
git add outline.txt
git commit -m 'Added Detailed Layout'
The moment you commit it, the Git shows the number of changes that you made to the file from the previous version.
1 file changed, 6 insertions(+), 2 deletions(-)
5. But wait, how many changes did we make so far?
To see the total changes that we made so far:
git log
And the output would be:
commit 826d9f5b080deb357c990f9e2e48cab3f4e1292a (HEAD -> master)
Author: Your Name <Your Valid email>
Date:   Sun Sep 6 17:16:44 2020 -0600

    Added Detailed Layout

commit 437b001da21db7732f1bf7a75b241c9ae8e06168
Author: Your Name <Your Valid email>
Date:   Sun Sep 6 17:14:42 2020 -0600

    Basic Outline
Each block above has a unique commit id, the author and the date & time followed by the commit message.
To visit a particular version of the outline.txt file that we did from the log above, we could just visit it by the using the corresponding commit id.
git checkout 437b001da21db7732f1bf7a75b241c9ae8e06168
Note: The above commit id would be different based on the user.
To go back to the latest version in master,
git checkout master
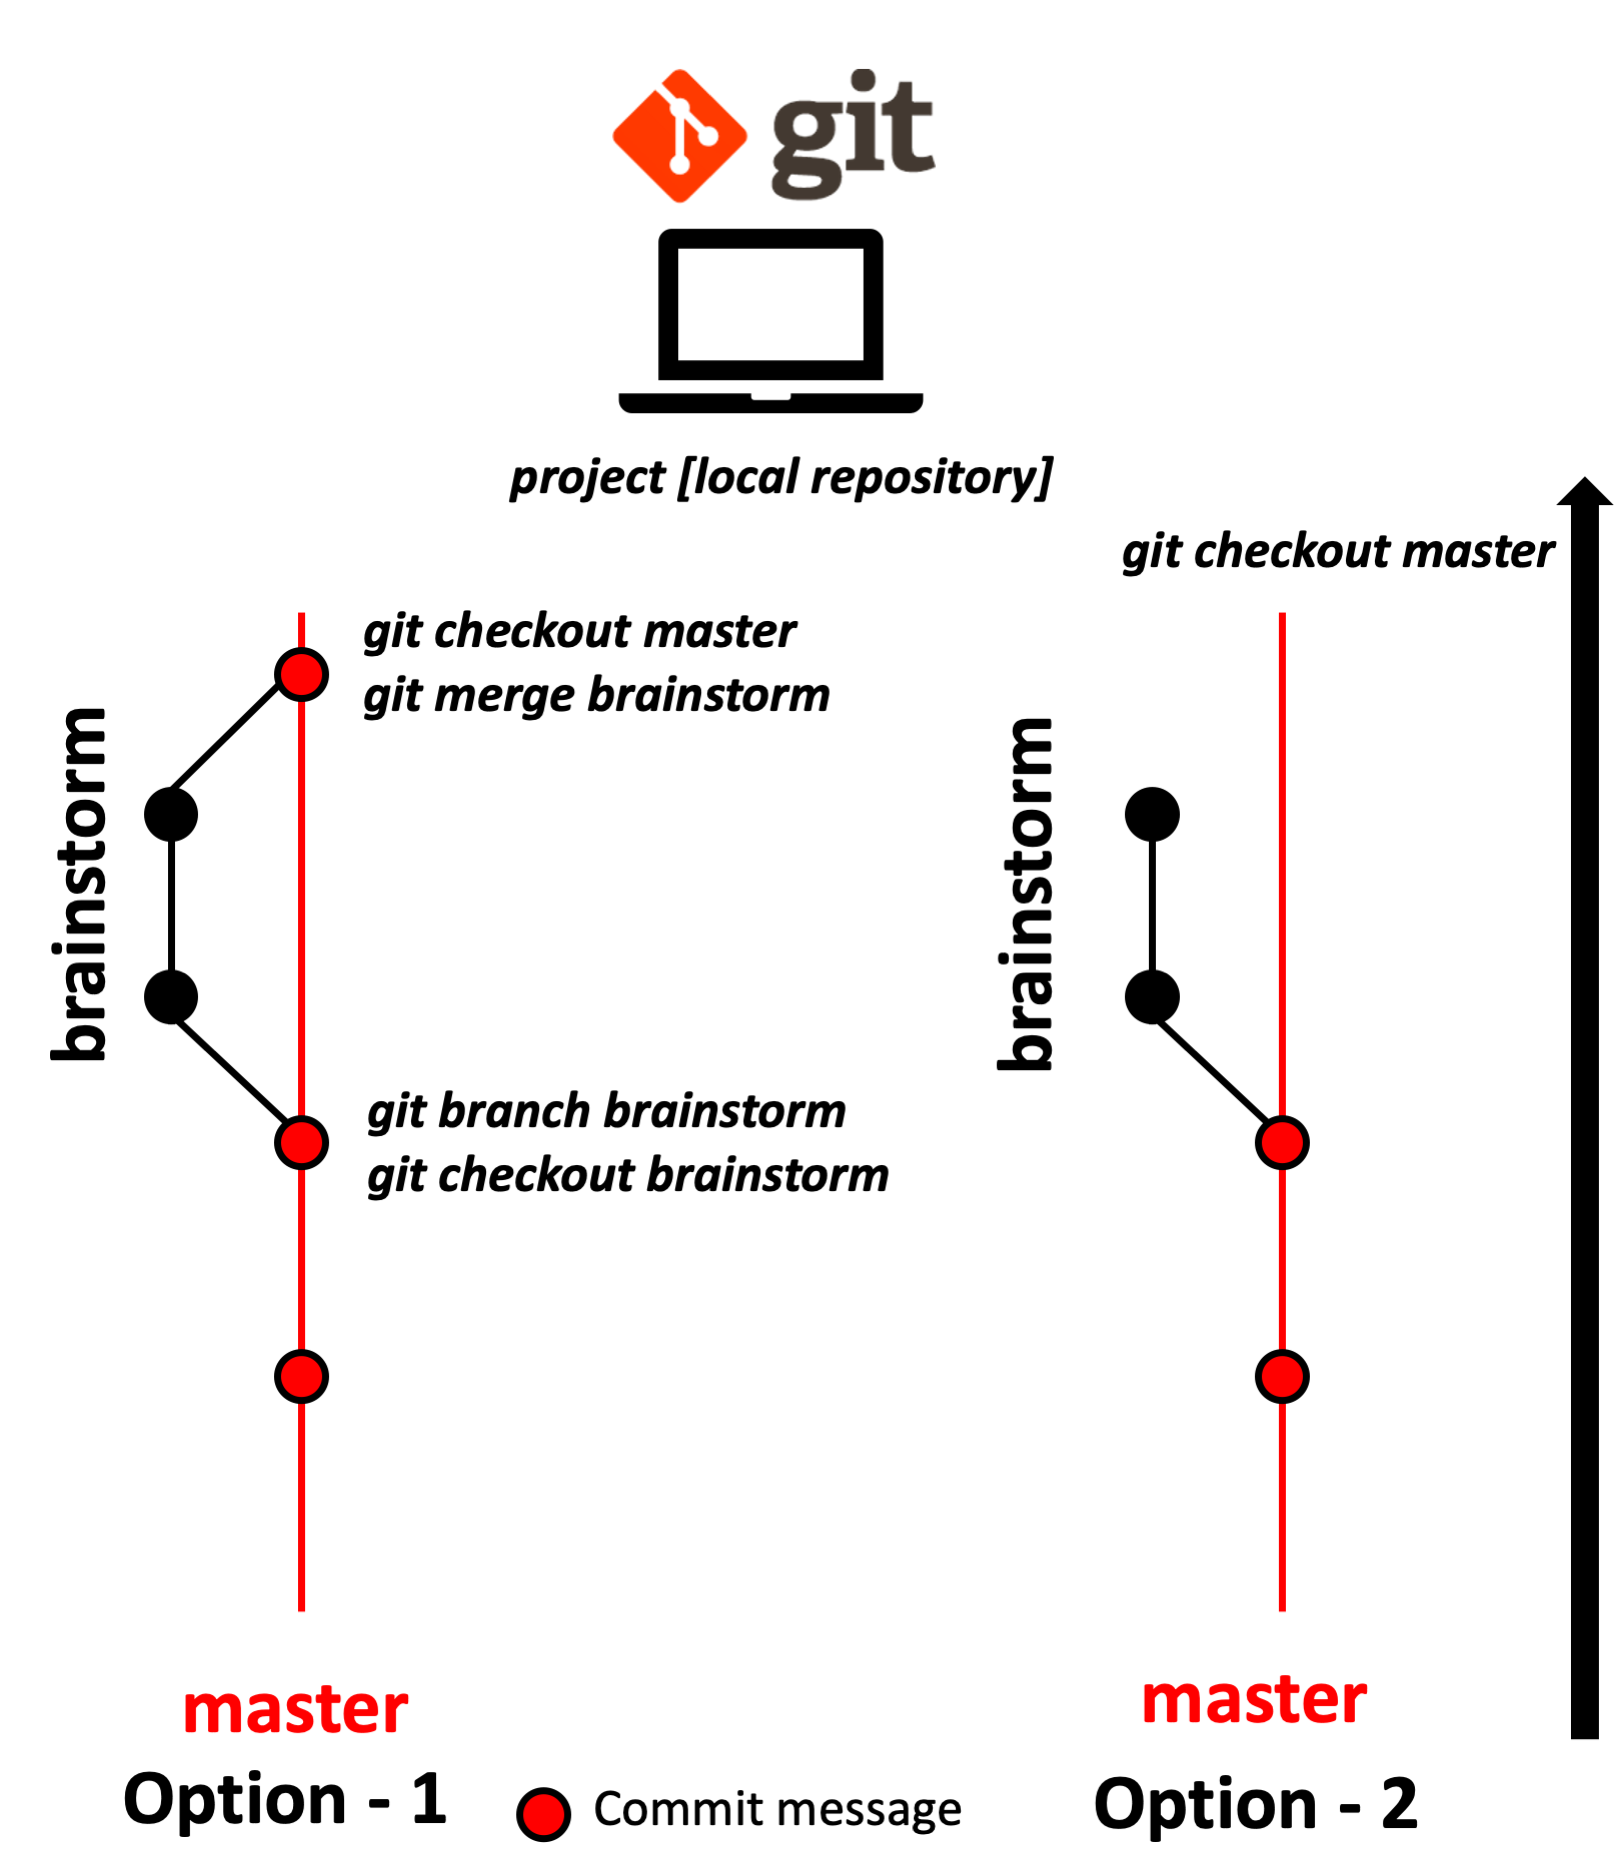
6. Brainstorm for new outline
Now, the scientists in us kick in, and we want to go on an exploration mode. Ideally, we don’t want to mess up the clean version that we already have in master. Let’s branch out from the latest version in master and create a new branch called brainstorm and make any changes that you wish to make.
git branch brainstorm
git checkout brainstorm
This will show an output message:
Switched to branch 'brainstorm'
Let’s do our changes as before by opening the file.,
nano outline.txt
And do all the changes that you are interested in, save and exit out of the editor. Let’s add the file to the staging area and commit it again.
git add outline.txt
git commit -m 'Brainstorm version'
7. Two options ahead of us
We have two options before us now after experimenting with the brainstorm branch:
Option 1: We very much like the changes that we did in the brainstorm branch and want to merge it back with our default branch master.
git checkout master
git merge brainstorm
Option 2: If we don’t like the changes that we made in the brainstorm branch, we could simply switch back to ‘master’.
git checkout master
This way we are going back to the previous version without taking any modifications that we did in brainstorm branch. To delete the brainstorm branch,
git branch -d brainstorm
8. Hosting it in Github
So far, we managed all our workflow in a Git repository within a local machine. To work on a collaborative project with other users, it is important now to take the work that we did and host it in Github. In my next blog post, I will take you through how to translate this work to the Github. With more people working on a project, conflicts bound to occur. I will also be presenting ways to manage merge conflicts using Git.
Stay tuned! Please do contact me, if you have any comments or suggestions about this tutorial.